Heading out the door? Read this article on the new Outside+ app available now on iOS devices for members! Download the app.

Retread Worn-out Heels
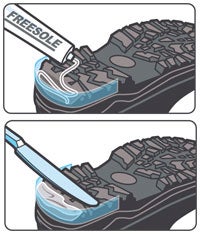
Apply a piece of cellophane tape along the perimeter of your clean, dry boot sole; the tape acts like a dam, keeping the new material flush with the original edge. Apply a generous amount of Gear Aid’s Freesole Urethane Shoe Repair ($7; 1 oz.; gear-aid.com) to the worn area (A). Use a plastic knife to spread the goo and level it with the original sole (B). Then, keeping the boots perfectly level (arrange a cradle of bricks or boxes before you start), let the glue cure for 48 hours, remove tape, and hit the trail.
Seal a Leaky Shell
Tiny burns/holes (Less than ¼-inch)
First, clean the area with an alcohol prep pad, then back the hole with a piece of tape so the adhesive doesn’t seep through. Spread a dab of Gear Aid Seam Grip ($7; 1 oz.; gear-aid.com) into the hole (extend it ¼ inch past the edges) with a plastic knife or toothpick, and allow it to cure for about eight hours before removing the backing.
Medium-size tears and rips (Less than 3 x 3 inches)
Trim loose or fraying threads and wipe down the area around the hole with an alcohol pad. Trim a Tear-Aid patch ($9; tear-aid.com) so it has rounded edges—which won’t peel up as readily as squared ones—and extends at least ¼ to ½ inch past the rip’s ends. Apply the patch to the hole and seal it: Either apply an identical second patch to the fabric’s opposite side (make sure the patches bond at the rip), or smear the hole’s edges (on the back side of the fabric) or your patch’s edges (for lined or insulated fabrics) with Seam Grip. For holes larger than your hand, opt for professional repair so you don’t compromise high-tech fabric performance.
Restore waterproof treatments
If you notice raindrops absorbing instead of beading on contact, refresh your shell’s DWR treatment: Wash the jacket with a technical soap like ReviveX Synthetic Fabric Cleaner ($9; 12 oz.; gear-aid.com) and put it through an extra rinse cycle. Spray your wet coat (hang it on a hanger) with a waterproofer like ReviveX Waterproofing Spray ($9; 5 oz.). Hold the bottle five to eight inches away and spray in sweeping strokes, focusing on the shoulders. Toss your jacket into the dryer and tumble it for 30 to 45 minutes.
Fix a Flicker
Clean your headlamp’s battery connections with a stiff brush or sandpaper and apply a thin film of dielectric silicone grease.
Quick Zipper Fixes
Broken pull
For zippers that open on the top and bottom, like on a coat, use wire cutters to crack off the top stopper, remove the broken slider, slip on a new one, and use pliers to apply a new top stopper. (Stoppers and standard sliders are available at fabric stores.) On a nonseparating zipper, like one sewn into a pack lid, pry the slider loose with a screwdriver (you may need to clip large sliders off with carpenter’s pincers). Replace it with a screw-on slider from FixnZip ($10; fixnzip.com).
Sticky teeth/coils
Inspect the cause of the stoppage and remove it. Then pull the fabric, not the pull tab, to avoid bending the slider, teeth, or coils. Clean out grime with a stiff brush. Lube your zipper with a dab of lip balm.
Misaligned teeth
On a coil zipper, comb through coils in a damaged area with a knife or needle to straighten them. On zippers with individual teeth, gently pinch a crooked tooth back into place with pliers. If a tooth is broken, you’ll need to replace the entire closure.
Loose zipper
Pack lid won’t stay shut? Use pliers to gently pinch the top and bottom of the slider body together on both sides of the pull-tab loop.
Become a Gear Expert
Want to learn to do all this and more? Sign up for Outdoor Gear Maintenance and Repair, an online class through AIM Adventure U.